Maps
[toggle style="v4 no-toggle-border" opentitle="How to read our maps" closetitle="How to read our maps"]
The object of this app is to help you find fish – to find where the fish are at any time of the season by highlighting the areas fish might be holding before you even arrive at the boat ramp. This may be deep or shallow water, around identified structures or dependent on the current weather.
Pre-trip Planning: Viewing the app on a desktop pc before you hit the water gives a detailed view of your selected waterway on a large screen. This view allows you to determine the area you want to fish and by utilising the pan, zoom and filter functions you can plan and target the area you want to fish.
Our maps are colour coded to help you find your targeted water depth, deep water is shaded a darker blue and shallow water is shaded a lighter blue and on selected waterways the intermediate zone is also identified.
Depth contours range from deep (dark blue) to shallow (red) the shaded relief (3D view) also uses this colour range.
Structures are plotted on selected waterways and you can add your own waypoints by selecting the tool box situated on the top right hand of the web app screen, or bottom nav bar on the iPhone app.
On the water:
Your position on the waterway can be pinpointed by selecting the geo-location button, it’s then just a matter of travelling to your selected area.
Offline maps:
In areas where there is no internet coverage our offline maps give the iPhone app full functionality. All tools are available except for real time weather and shaded relief (3D contours).
[/toggle]
[toggle style="v4 no-toggle-border" opentitle="What do the icons/colours mean?" closetitle="What do the icons/colours mean?"]
- Deep Water
- Intermediate Water
- Shallow Water
- Water/Ocean
- Parks/Islands
- Islands
- Land
- Wetlands/Swamps
- Woodland
- Rivers/Creeks
- Roads
- Depth Contours
- Port Buoy
- Starboard Buoy
- Yellow Buoy
- Orange Buoy
- White Buoy
- Port Unofficial Buoy, Picket, Can
- Starboard Unofficial Buoy, Picket, Can
- Yellow Unofficial Buoy, Picket, Can
- Orange Unofficial Buoy, Picket, Can
- White Unofficial Buoy, Picket, Can
- Laydown/Sub Surface Obstruction
- Boat Ramp
- Public Wharf, Jetty or Landing
- Wreck
- Snag
- Camping Ground
- Caravan Park
- Public Toilet
- Starboard Pipe Beacon
- Port Pipe Beacon
- Isolated Danger Pipe Beacon
- Special Pipe Beacon
- Lit Stbd. Beacon no top mark
- Lit Starboard Beacon with TM
- Lit Port Beacon no top mark
- Lit Port Beacon with TM
- White Light Beacon
- Yellow Light Beacon
- Lit South Cardinal Beacon
- Lit East Cardinal Beacon
- Lit Special Mark Beacon
- Major Light House
- Lit Front Lead Triangle Beacon
- Lit Rear Lead Triangle Beacon
- Lit Lead Oblong Beacon
- Lit Lead Oblong Beacon
- Starboard Buoy no top mark
- Starboard Aqua Buoy
- Port Buoy no top mark
- Port Buoy with TM
- Port Aqua Buoy
- North Cardinal Aqua Buoy
- East Cardinal Aqua Buoy
- Iso. Danger Aqua Buoy
- Iso. Danger Pillar Buoy
- Nth. Cardinal Conical Buoy
- East Cardinal Conical Buoy
- West Cardinal Conical Buoy
- Iso. Danger Conical Buoy
- Sth. Cardinal Can Buoy
- West Cardinal Can Buoy
- Special Mark Conical Buoy
- Special Mark Aqua Buoy
- Special Mark Conical Buoy NTM
- Pink Beehive Public Mooring
- Lit Stbd Buoy no top mark
- Lit Stbd Buoy with TM
- Lit Port Buoy no top mark
- Lit Port Buoy with TM
- Lit Port Aqua Buoy
- Lit Special Mark Aqua Buoy
- Lit Iso. Danger Pillar Buoy
- Lit Special Mark Can Buoy
- Red Aqua Buoy
- Caution Submerged Rocks
- Post Monument or Feature
- Fishing Platform or Artificial Reef
[/toggle]
[toggle style="v4 no-toggle-border" opentitle="Map Layers" closetitle="Map Layers"]
Our online maps are comprised of a few different layers (map data varies between maps).
Please note: Offline maps do not have layers.
- Base Map: This layer is always visible and displays deep, intermediate and shallow water, lakes, rivers, creeks, lagoons & islands.
 Depth Contours: This layer displays colour coded depth contours, can be toggled on and off.
 3D Shaded Relief: This layer displays a 3D rendering of depth data (not all maps have enough detail yet for 3D contours), can be toggled on and off – off by default.
 Waypoints: This layer displays locations of navigation aids, wrecks, ramps, hazards & more, can be toggled on and off.
 Laydowns: This layer displays locations of fallen timber (not displayed on all maps), can be toggled on and off.
- User added Markers/Catches: These layers display your own waypoints & public waypoints (shared by other users), can be toggled on and off.
 Markers: These are useful to mark locations of structures, snags, fishing holes etc.
 Catches: Log your catch details including location, species, weight, weather conditions and more.
Toggle layers on and off
iPhone App
- Select the map you wish to view from the Maps list
- Select the
 Tools icon from the bottom tab bar, the tools panel will open
 - Select the
 Layers icon, a list of layers will display
 - Tap the layer to toggle on and off
- Select the Back button to close the Layers window
The iPhone App will remember you settings for next time
Web App
- Select the map you wish to view from the Maps list
- Select the
 Tools icon in the top right hand corner of the map page, the tools panel will slide down
 - Select the
 Layers icon, a list of layers will display
 - Click/tap the layer to toggle on and off
- Select the X to close the Layers window
A tick in the iPhone map confirms the layer is on.
A full colour icon in the Web App confirms the layer is on.
[/toggle]
[toggle style="v4 no-toggle-border" opentitle="How do i turn on the 3D contours?" closetitle="How do i turn on the 3D contours?"]
iPhone App
- Select the map you wish to view from the Maps list
- Select the Tools icon from the bottom tab bar, the tools panel will fly out
- Select the Layers icon (the first icon on the left), a list of layers will display
- Turn on the 3D Shaded Relief layer (tap to toggle on and off)
- Select the Back button to close the Layers screen
- The 3D layer should now be visible on the map
Web App
- Select the map you wish to view from the Maps list
- Select the Tools icon in the top right hand corner of the map page, the tools panel will slide down
- Select the Layers icon (the first icon on the left), a list of layers will display
- Turn on the 3D Shaded Relief layer (click/tap to toggle on and off)
- Select the X to close the Layers window
- The 3D layer should now be visible on the map
Please note: Not all maps have enough detail yet for 3D contours, once we have gathered enough depth information for the area a 3D shaded relief layer will be added.
[/toggle]
[toggle style="v4 no-toggle-border" opentitle="Map Information – Waterway Tips & Features" closetitle="Map Information – Waterway Tips & Features"]
Every map includes Tips & Features with contacts for local guides and tackle stores nearby.
iPhone App
- Select the
 Info/More icon from the map screen
 - Tap the title bar to expand the text panel
Web App
- Select the Tools icon in the top right hand corner of the map page, the tools panel will slide down
- Select the
 Info icon, the info panel will display
 - Select the title bar to expand the text panel
- Select the X to close the info panel
Each waterway includes:
- Features/Tips
- Common Fish Species
- Bait used in the area
- Hazards/Warnings
- Updates (lists any updates made to the map)
[/toggle]
[toggle style="v4 no-toggle-border" opentitle="How do i rate a map?" closetitle="How do i rate a map?"]
Each user has the ability to rate a map out of 5. These are displayed as stars in the map list.
iPhone App
- Select the Info/More icon from the map screen
- Tap the
 Star icon (top right corner)
 - Select the number of stars from the picker
- Tap Done
- Once you have rated the map the star icon will dim
Web App
- Select the Tools icon in the top right hand corner of the map page, the tools panel will slide down
- Select the Info icon, the info panel will display
- Hover over the stars, as you hover they will turn yellow. Click on the star that represents your rating eg: to rate 4 stars click on the 4th star from the left

- Your rating will be saved
- Select the X to close the info panel
[/toggle]
[toggle style="v4 no-toggle-border" opentitle="How do i like a map?" closetitle="How do i like a map?"]
Each user has the ability to like a map. The number of likes are displayed in the map list.
iPhone App
- Select the Info/More icon from the map screen
- Tap the
 Heart icon (top right corner)
 - You will be asked if you want to like the map, tap Yes
- Once you have rated the map the heart icon will dim
- The like count will increase and the heart (underneath the waterway image) will turn blue
Web App
- Select the Tools icon in the top right hand corner of the map page, the tools panel will slide down
- Select the Info icon, the info panel will display
- Click the heart (located underneath the waterway image)
 The like count will increase and the heart will turn blue, this means you have liked this map
- Select the X to close the info panel
[/toggle]
[toggle style="v4 no-toggle-border" opentitle="What does the flame mean in the map list?" closetitle="What does the flame mean in the map list?"]
![]() The flame means the location is hot and is currently experiencing good fishing.
The flame means the location is hot and is currently experiencing good fishing.
[/toggle]
[toggle style="v4 no-toggle-border" opentitle="Can i add my own maps?" closetitle="Can i add my own maps?"]
We offer private maps to our members – there are two options available:
- If you already have depth data for a waterway we can setup a private map and create 2D & 3D contours for you with your data. You would then have exclusive access to this map and our other map features such as logging catches, adding markers and real-time weather. There is also the option of making your map public, this does depend on the quality of the data supplied but we would be happy to discuss this with you.
- OR you can tell us your favourite waterway and we can add this to your private maps – it would not have depth data but you would have access to our other features including the ability to log catches, add markers, access weather conditions, show your current position on the map and more.
[/toggle]
Offline Maps
[toggle style="v4 no-toggle-border" opentitle="How do Offline Maps work?" closetitle="How do Offline Maps work?"]
The standout feature of the iPhone App is the OFFLINE functionality. This feature makes the app work very fast and includes the use of most functions excluding 3D Shaded Relief. The OFFLINE map is stored on your device so if you have no service the map is still visible and your last location and waypoints stored (this will be refreshed once you come back online, any functions that require a connection will not be available ie: weather).
To download an offline map:
- Select the desired map from the list
- Tap the
 Offline tab
 - You will be asked if you would like to download the map, tap Yes (maps will download faster when using a wifi connection)
- The download progress bar will show the progress of the download
Please note: Try not to let your phone go to sleep, this will interrupt the download process

- Once finished the map will appear in the window, the map will remain on your device until you log out or delete the app.
Offline maps do not support layers.
[/toggle]
[toggle style="v4 no-toggle-border" opentitle="How do i update my offline map?" closetitle="How do i update my offline map?"]
To update an offline map:
- Select the desired map from the list
- Tap the Offline tab
- Tap the
 Download icon
 - You will be asked if you would like to download the map, tap Yes (maps will download faster when using a wifi connection)
- The download progress bar will show the progress of the download
Please note: Try not to let your phone go to sleep, this will interrupt the download process
- Once finished the updated map will appear in the window, the map will remain on your device until you log out or delete the app.
[/toggle]
Geolocation
[toggle style="v4 no-toggle-border" opentitle="How do i know where i am on the map?" closetitle="How do i know where i am on the map?"]
Both the iPhone App & Web App have Geolocation services.
The iPhone App will display a ![]() blue dot on your location and an
blue dot on your location and an ![]() orange dot when tracking your location.
orange dot when tracking your location.
The Web App will display a ![]() blue dot and ring to highlight the area you are in.
blue dot and ring to highlight the area you are in.
[/toggle]
[toggle style="v4 no-toggle-border" opentitle="How do i switch geolocation tracking on?" closetitle="How do i switch geolocation tracking on?"]
The first time you enter the app you will need to confirm the use of geolocation.
If you haven’t done this turn it on on the iPhone by going to the Home screen > Settings > Privacy > Location Services.
iPhone App
There are two forms of geolocation – static location and location tracking.
![]() Blue Dot: The blue dot shows your location only (on by default)
Blue Dot: The blue dot shows your location only (on by default)
![]() Orange Dot: The orange dot will track your movement and adjust the map position accordingly
Orange Dot: The orange dot will track your movement and adjust the map position accordingly
- Select the Tools icon from the bottom tab bar on the map screen, the tools panel will fly out
- Select the
 Geolocation icon, the blue dot will turn orange. Select again to turn off.
Web App
- Select the Geolocation icon (top left, below the zoom buttons on map screen), this will start tracking your position. The geolocation icon will now show an orange centre
 , click again to turn off.
[/toggle]
[toggle style="v4 no-toggle-border" opentitle="Why is my Geolocation not very accurate?" closetitle="Why is my Geolocation not very accurate?"]
Different devices have different degrees of accuracy. And it’s safe to say that, in the vast majority of cases, the first location is not the most accurate due to a number of different factors (noted below).
The geolocation method on our maps gets periodic updates to the user’s location as they move and within a few minutes will give a more accurate position. The light blue circle around the small blue dot represents the area you are located within, the smaller the circle the more accurate your position will be. When adding a waypoint it is a good idea to enable geolocation tracking (cross hair icon) and wait for this to focus in on your position, this will give you a more accurate latitude and longitude when adding markers and catches.
Note: A mobile phone that has a GPS unit inside of it that is switched on is usually accurate within 3 meters. A mobile phone without a GPS unit, with the GPS unit switched off to maximize battery, or at a location where the GPS can’t contact the GPS satellites will have to use cell tower triangulation to estimate the users location and is typically accurate within 3000 meters. Cached locations are also often used.
[/toggle]
[toggle style="v4 no-toggle-border" opentitle="How do i fix the error “Geolocation error: User denied Geolocation.” or “Current location is not available.”?" closetitle="How do i fix the error “Geolocation error: User denied Geolocation.” or “Current location is not available.”?"]
On iPhone go to the Home screen > Settings > Privacy > Location Services and check that ChartedWater (iPhone App) or Safari (Webb App) is enabled.
[/toggle]
My Waypoints
[toggle style="v4 no-toggle-border" opentitle="What are My Waypoints?" closetitle="What are My Waypoints?"]
Charted Waters allows you to add your own waypoints to a map. Waypoints come in two formats – Markers & Catches.
- Markers: These are useful to mark locations of structures, snags, fishing holes etc.
- Catches: Log your catch details including location, species, weight, weather conditions and more.
To view a list of all your waypoints go to the Main Menu > ![]() Waypoints or use the
Waypoints or use the ![]() slide navigation on the left (swipe right on iPhone).
slide navigation on the left (swipe right on iPhone).
[/toggle]
[toggle style="v4 no-toggle-border" opentitle="How do i add my own marker?" closetitle="How do i add my own marker?"]
Markers are useful to mark locations of structures, snags, fishing holes etc.
To add your own marker to a map:
- Select the Tools icon on the map screen, this will display the tools panel
- Select the
 Add Marker icon
 - Enter in the details for your marker in the form. Some fields are automatically filled based on your location, these can be changed if necessary.
- Image: Take a picture of your location
- Lat: The latitude (by default this is set to your current location)
- Lon: The longitude
- Date/Time: Todays date and time by default
- Location: Name of the map your on or want to add the waypoint to
- Type: Marker
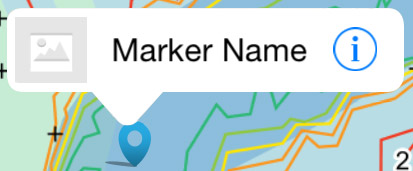
- Waypoint Name: Pick a name that best describes your marker. This is displayed when you tap the pin.
- Comments (optional): Add any notes associated with your marker
- Privacy: Choose if you want to keep the marker to yourself (Only Me) or share with others (Public)
- Tap Save, your marker will be added to the map
- Tap the pin to view the marker details
Private markers use the light blue pin
 Public markers use the dark blue pin
To view a list of all your markers go to the Main Menu > ![]() Waypoints or use the
Waypoints or use the ![]() slide navigation on the left (swipe right on iPhone).
slide navigation on the left (swipe right on iPhone).
[/toggle]
[toggle style="v4 no-toggle-border" opentitle="How do i add my own catch?" closetitle="How do i add my own catch?"]
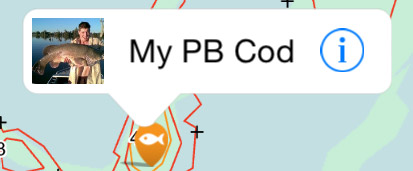
Catch waypoints enable you to keep a log of your catches including details on location, species, weight, size, lure/bait and weather conditions.
To log a catch and add a waypoint to the map:
- Select the Tools icon on the map screen, this will display the tools panel
- Select the
 Add Catch icon
 - Enter in the details for your catch in the form. Some fields are automatically filled based on your location, these can be changed if necessary.
- Image: Take a picture of your catch
- Lat: The latitude (by default this is set to your current location)
- Lon: The longitude
- Date/Time: Todays date and time by default
- Location: Name of the map your on or want to add the catch to
- Type: Catch
- Waypoint Name: Pick a name that best describes your catch. This is displayed when you tap the pin.
- Comments (optional): Add any notes associated with your catch
- Species: The species of the fish you caught eg: Murray Cod
- Weight: The weight of the fish in kilograms
- Size: The size of the fish in centimetres
- Caught On: Bait or lure name
- Weather: Conditions in which you caught the fish
- Privacy: Choose if you want to keep the catch to yourself (Only Me) or share with others (Public)
Note: If you want to keep your location private but still want to share your catch add the catch to the Bragging Board and set privacy to Only Me - Bragging Board: Choose to display your catch on the Bragging Board (only visible to other Charted Waters users)
- Facebook: Choose to share your catch with your friends on Facebook (iPhone App only)
- Twitter: Choose to share your catch with your friends on Twitter (iPhone App only)
- Tap/Click Save, your catch will be added to the map
- Tap/Click the pin to view the catch details
Private catches use the red pin
 Public catches use the orange pin
To view a list of all your catches go to the Main Menu > ![]() Waypoints or use the
Waypoints or use the ![]() slide navigation on the left (swipe right on iPhone).
slide navigation on the left (swipe right on iPhone).
[/toggle]
[toggle style="v4 no-toggle-border" opentitle="What is the difference between public and private Waypoints?" closetitle="What is the difference between public and private Waypoints?"]
Private markers or catches are for your viewing only. No one else can view these waypoints. To make a waypoint private set Privacy to Only Me.
![]() Private markers use the light blue pin
Private markers use the light blue pin
![]() Private catches use the red pin
Private catches use the red pin
Public markers or catches are shared waypoints. Waypoints marked as public are made visible to all other users, Charted Waters makes it possible to share your great catch, snag or hazard with others. To make a waypoint public set Privacy to Public.
![]() Public markers use the dark blue pin
Public markers use the dark blue pin
![]() Public catches use the orange pin
Public catches use the orange pin
If you want to share your catch but not the location add your catch to the Bragging Board and set Privacy to Only Me, this way other users can see your catch but wont know the exact location of it.
![]() Bragging Board catches use the orange pin with the BB tag
Bragging Board catches use the orange pin with the BB tag
[/toggle]
[toggle style="v4 no-toggle-border" opentitle="Can i view a list of all my saved Waypoints?" closetitle="Can i view a list of all my saved Waypoints?"]
Yes. Go to the Main Menu > ![]() Waypoints or use the
Waypoints or use the ![]() slide navigation on the left (swipe right on iPhone).
slide navigation on the left (swipe right on iPhone).
[/toggle]
[toggle style="v4 no-toggle-border" opentitle="It won’t let me add a waypoint, what do i do?" closetitle="It won’t let me add a waypoint, what do i do?"]
Please make sure you are using the most recent version of the Charted Waters iPhone App. To install the update go to App Store > Updates > ChartedWaters. This will enable you to add waypoints, use the Bragging Board and improve your overall user experience.
You will also need an internet connection to save the waypoint to your account.
If you are still experiencing problems please contact support on [email protected].
[/toggle]
[toggle style="v4 no-toggle-border" opentitle="How do i edit a waypoint (marker or catch)?" closetitle="How do i edit a waypoint (marker or catch)?"]
- Go to
 Waypoints
 - Select the waypoint you want to edit
- OR Select the waypoint map pin e.g.: >
 i button
 - Click the
 Edit icon (top right)
 - Edit the fields as neccessary
- Tap/click Save
[/toggle]
[toggle style="v4 no-toggle-border" opentitle="How do i delete a Waypoint?" closetitle="How do i delete a Waypoint?"]
iPhone App
- Go to Waypoints
- Find the waypoint you want to delete
- Swipe left to reveal the delete button
- Tap Delete

Web App
- Go to Waypoints
- Select the waypoint you want to delete
- Click the Edit icon (top right)
- Scroll down to the bottom of the form and click/tap the Delete button
[/toggle]
[toggle style="v4 no-toggle-border" opentitle="I can’t see my saved waypoints on the map?" closetitle="I can’t see my saved waypoints on the map?"]
Make sure the marker & catch layers are turned on in the map layers.
A tick in the iPhone map confirms the layer is on.
A full colour icon in the Web App confirms the layer is on.
- Select the Tools icon on the map screen, the tools panel will open
- Select the Layers icon, a list of layers will display
- Turn on the markers & catch layers (tap to toggle on and off)
- Select the Back button in the iPhone App or X in the Web App to close the Layers window
The iPhone App will remember you settings for next time.
[/toggle]
[toggle style="v4 no-toggle-border" opentitle="How do i share my catch on Facebook or Twitter?" closetitle="How do i share my catch on Facebook or Twitter?"]
Any catch waypoint can be shared on Facebook and Twitter. This feature is only available in the iPhone App.
To share your catch with friends:
- Add a catch (if you have already added a catch navigate to the catch > edit and go to step 4):
- Select the Tools icon on the map screen, this will display the tools panel
- Select the Add Catch icon
- Enter in the details for your catch in the form. Some fields are automatically filled based on your location, these can be changed if necessary.
- Tap the
 Facebook button, a pop-up window will appear, alter the post if needed and tap Post
Note: You will need to enable Facebook on your phone. Go to your phones Home Screen > Settings (not the Charted Waters Settings) > Facebook - Tap the
 Twitter button, a pop-up window will appear, alter the post if needed and tap Post
Note: You will need to enable Twitter on your phone. Go to your phones Home Screen > Settings (not the Charted Waters Settings) > Twitter - Tap/Click Save
[/toggle]
Bragging Board
[toggle style="v4 no-toggle-border" opentitle="How do i add my catch to the bragging board?" closetitle="How do i add my catch to the bragging board?"]
All users have the ability to brag.
The first step is to add a catch (if you have already added a catch, navigate to the catch > edit & update the bragging board field):
See ‘How do i add my own catch?’ under My Waypoints for more info on adding catches.
- Select the Tools icon on the map screen, this will display the tools panel
- Select the Add Catch icon
- Enter in the details for your catch in the form. Some fields are automatically filled based on your location, these can be changed if necessary.
- In the Bragging Board field turn the switch on
Note: If you want to keep your location private but still want to share your catch add set privacy to Only Me - Tap/Click Save
To view your catch on the Bragging Board
- Go to the Main Menu >
 Bragging Board or use the
  slide navigation on the left (swipe right on iPhone).
 - Your catch photo will be visible in the gallery
- Tap/click to view the catch details
- You and other Charted Waters users are able to Like or Comment on your catch.
Please note: comments are only visible in the web app.
[/toggle]
User Settings / General
[toggle style="v4 no-toggle-border" opentitle="How do i update my user account details or change my password?" closetitle="How do i update my user account details or change my password?"]
Updating your user details, including your password, is done through the Web App.
- Login on your desktop computer or tablet
- Go to the Main Menu >
 Settings or use the slide navigation on the left
 - Update your details and click Save all Changes
[/toggle]
[toggle style="v4 no-toggle-border" opentitle="How do i unsubscribe?" closetitle="How do i unsubscribe?"]
To unsubscribe:
- Login to the Web App on your desktop computer or tablet
- Go to the Main Menu > Settings or use the slide navigation on the left
- Scroll down and click the Unsubscribe button
Charted Waters does not refund for unused portions of subscriptions. When you cancel your subscription, you will continue to have access until the end of your current subscription term. At that time, Charted Waters will remove access to the members area.
[/toggle]
[toggle style="v4 no-toggle-border" opentitle="Feedback/Support" closetitle="Feedback/Support"]
If you are having problems or would like to offer feedback on your Charted Waters product please email us at [email protected], we are happy to help.
[/toggle]
Weather
[toggle style="v4 no-toggle-border" opentitle="How do i access weather conditions for a waterway?" closetitle="How do i access weather conditions for a waterway?"]
To view real-time weather conditions for a waterway:
- Select the Tools icon on the map screen, this will display the tools panel
- Select the
 Weather icon
[/toggle]